
How to set up an admin API user in Salesforce and create contacts
.png)

Salesforce is a widely used customer relationship management (CRM) platform that offers a range of features to help businesses manage their customer interactions and data.
One of the key features of Salesforce is its API, which allows developers to integrate the platform with other systems and automate various tasks. It allows businesses to streamline operations and increase efficiency and productivity. However, Salesforce's API can be tricky to work with, especially for those new to the platform.
This article provides a step-by-step guide for setting up admin API access in Salesforce and creating contacts using Python. By the end of this tutorial, you'll have a basic understanding of how to authenticate with the Salesforce API, create contacts using the Admin API, and set up webhooks to respond to different events, such as when a new contact is created.
You can find the code for this tutorial on GitHub.
Prerequisites
To follow along with this tutorial, make sure you have the following:
- Python 3.x
- Salesforce account
- ngrok
You'll need a Salesforce Developer Edition account or a Salesforce Enterprise, Performance, or Unlimited Edition account with API access enabled. You can sign up for a Salesforce Developer Edition account for free. If you have an existing Enterprise, Performance, or Unlimited Edition account, you can enable API access by contacting your Salesforce administrator.
You'll also need to install the following Python libraries:
- <code class="blog_inline-code">flask</code>
- <code class="blog_inline-code">xmltodict</code>
- <code class="blog_inline-code">requests</code>
You will use <code class="blog_inline-code">requests</code> to talk to the Salesforce Admin API, <code class="blog_inline-code">flask</code> will help you create a web server for handling your Salesforce webhooks, and <code class="blog_inline-code">xmltodict</code> will help you parse the XML data passed by Salesforce via the webhook.
Here is a requirements.txt file that you can use to manage your dependencies:
You can install these requirements using pip by running the command <code class="blog_inline-code">pip install -r requirements.txt</code>.
With these dependencies installed, you're ready to get started with integrating Salesforce into your platform.
Authenticate with Salesforce and Obtain Access Token
To interact with the Salesforce API, you must first handle authentication and generate an API token. Salesforce uses OAuth 2.0 for authentication, and it requires you to register an app with Salesforce and obtain a client ID and secret. You can then use these credentials to obtain an access token, which you'll use to authorize API requests.
Here are the steps to handle authentication and generate an API token:
First, you need to register an app in Salesforce. Go to your Salesforce instance and log in as an administrator. Navigate to Setup in the top right corner, and click on Apps under Platform Tools. In the Apps section, click on App Manager, then click on the New Connected App button.
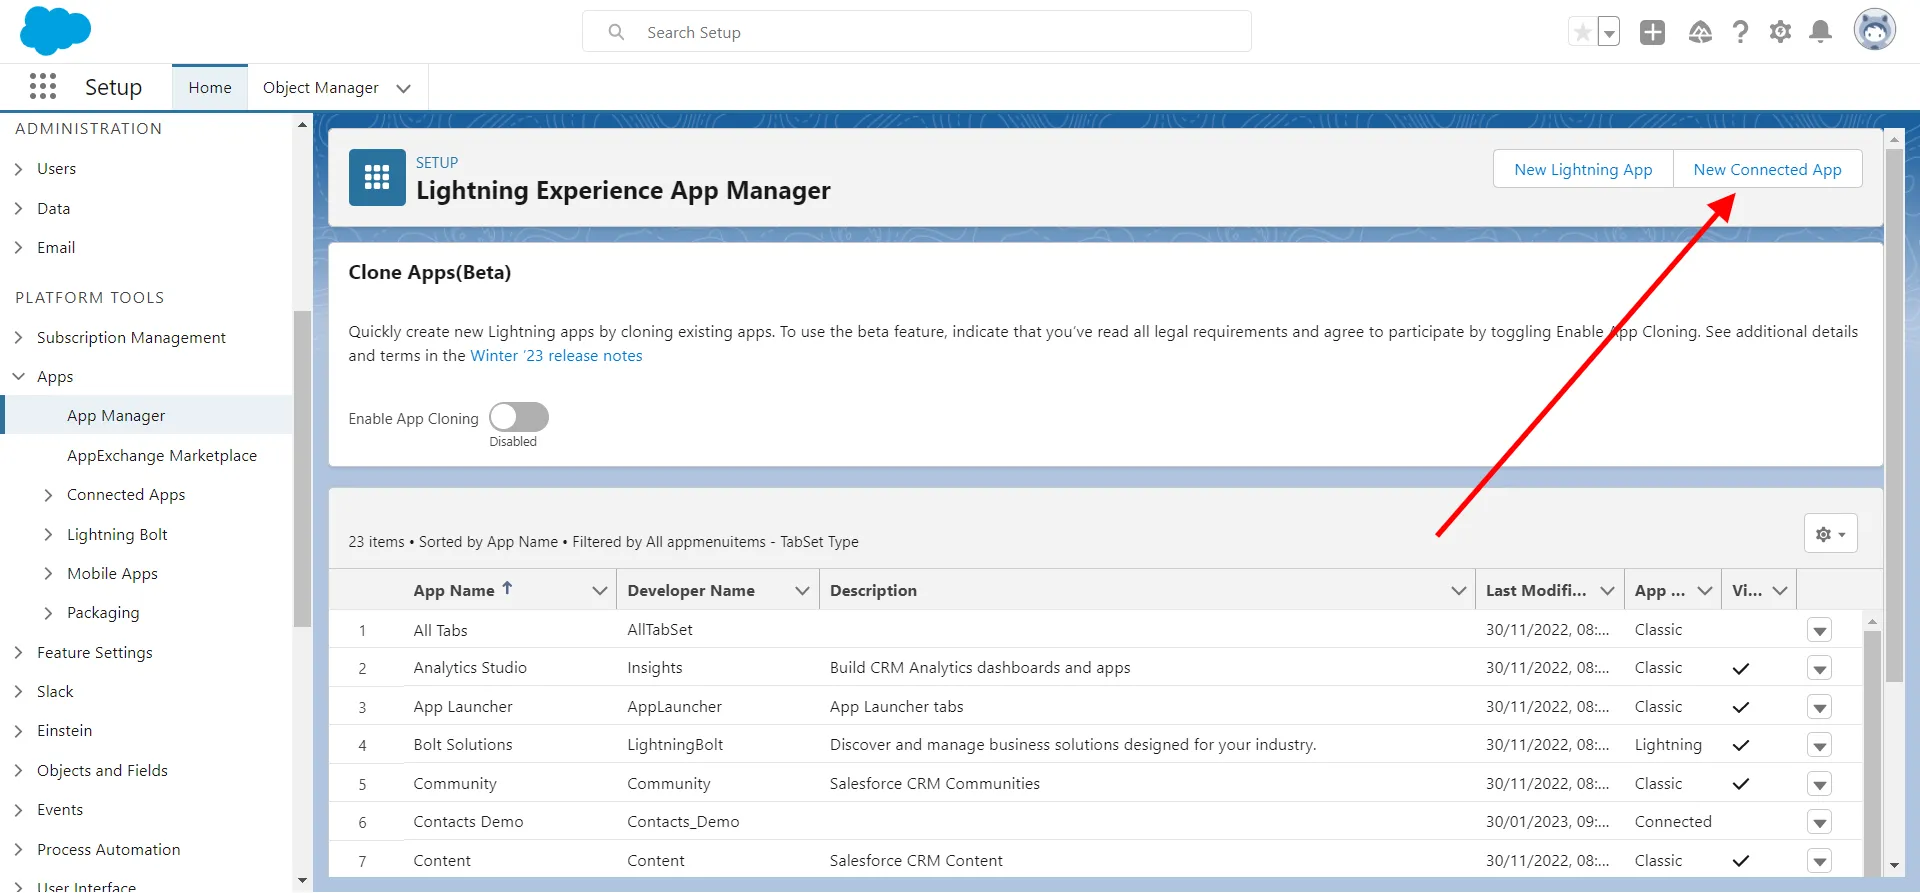
Fill in the required information, such as the name and email of your app, and select Enable OAuth Settings.
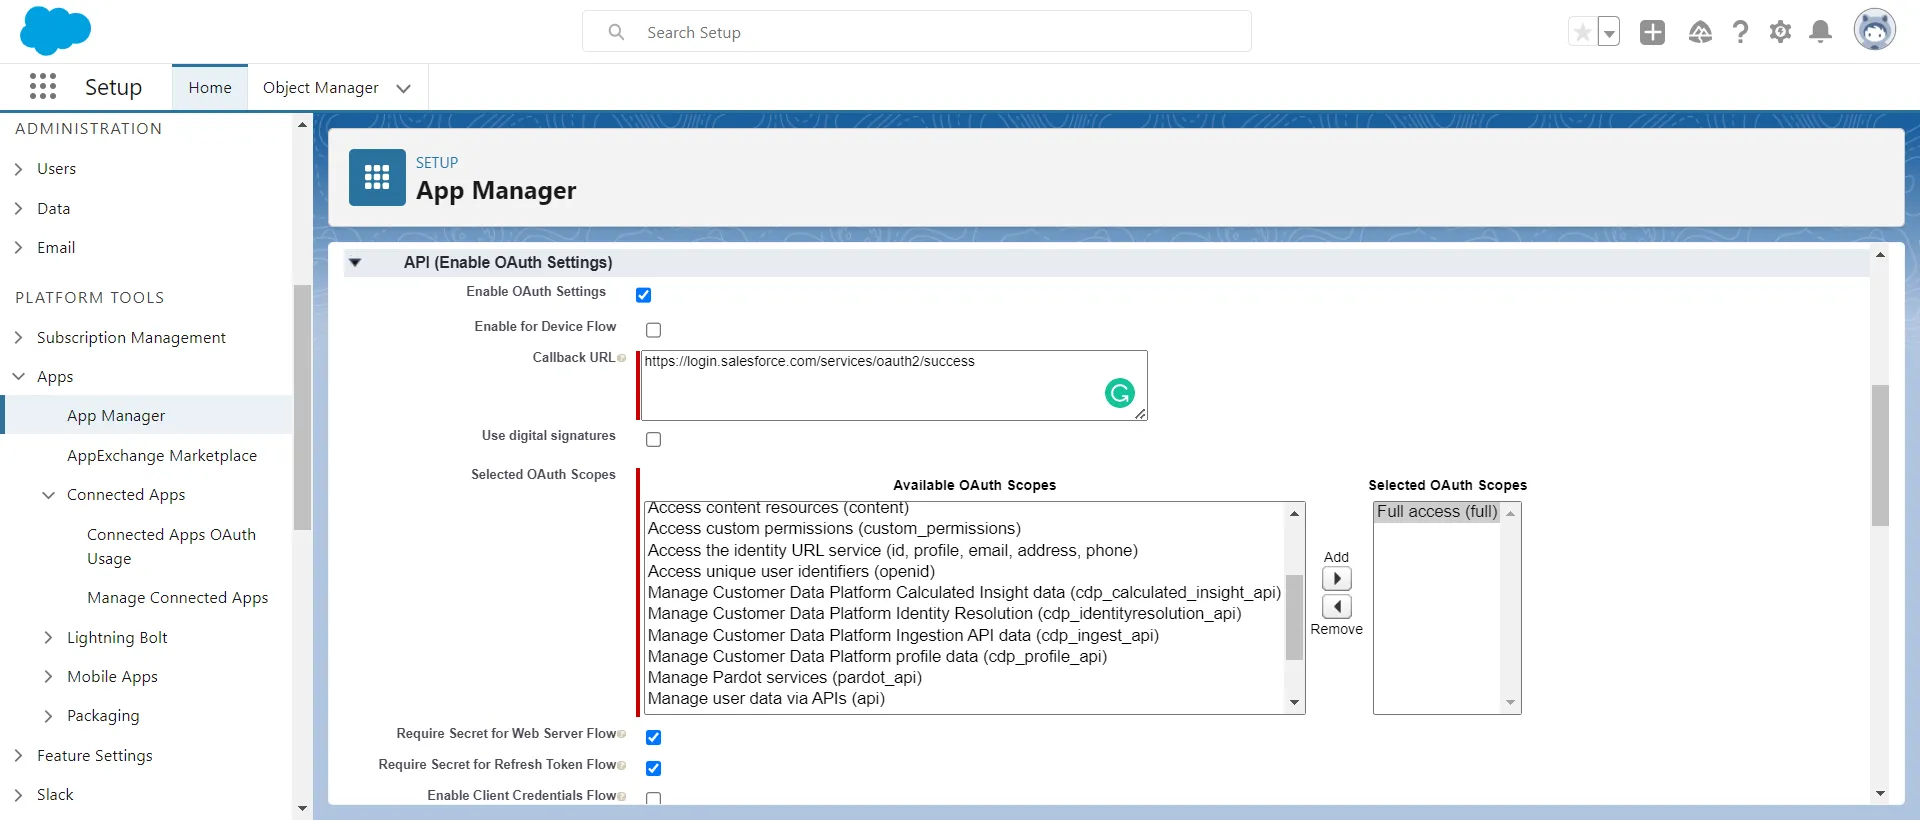
Next, you need to enable API access. In the OAuth Settings section, add your callback URL or use <code class="blog_inline-code">https://login.salesforce.com/services/oauth2/success</code> if you do not have one and select Full access (full) for the Selected OAuth Scopes field. Then click Save. You'll be redirected to a page showing your app details.
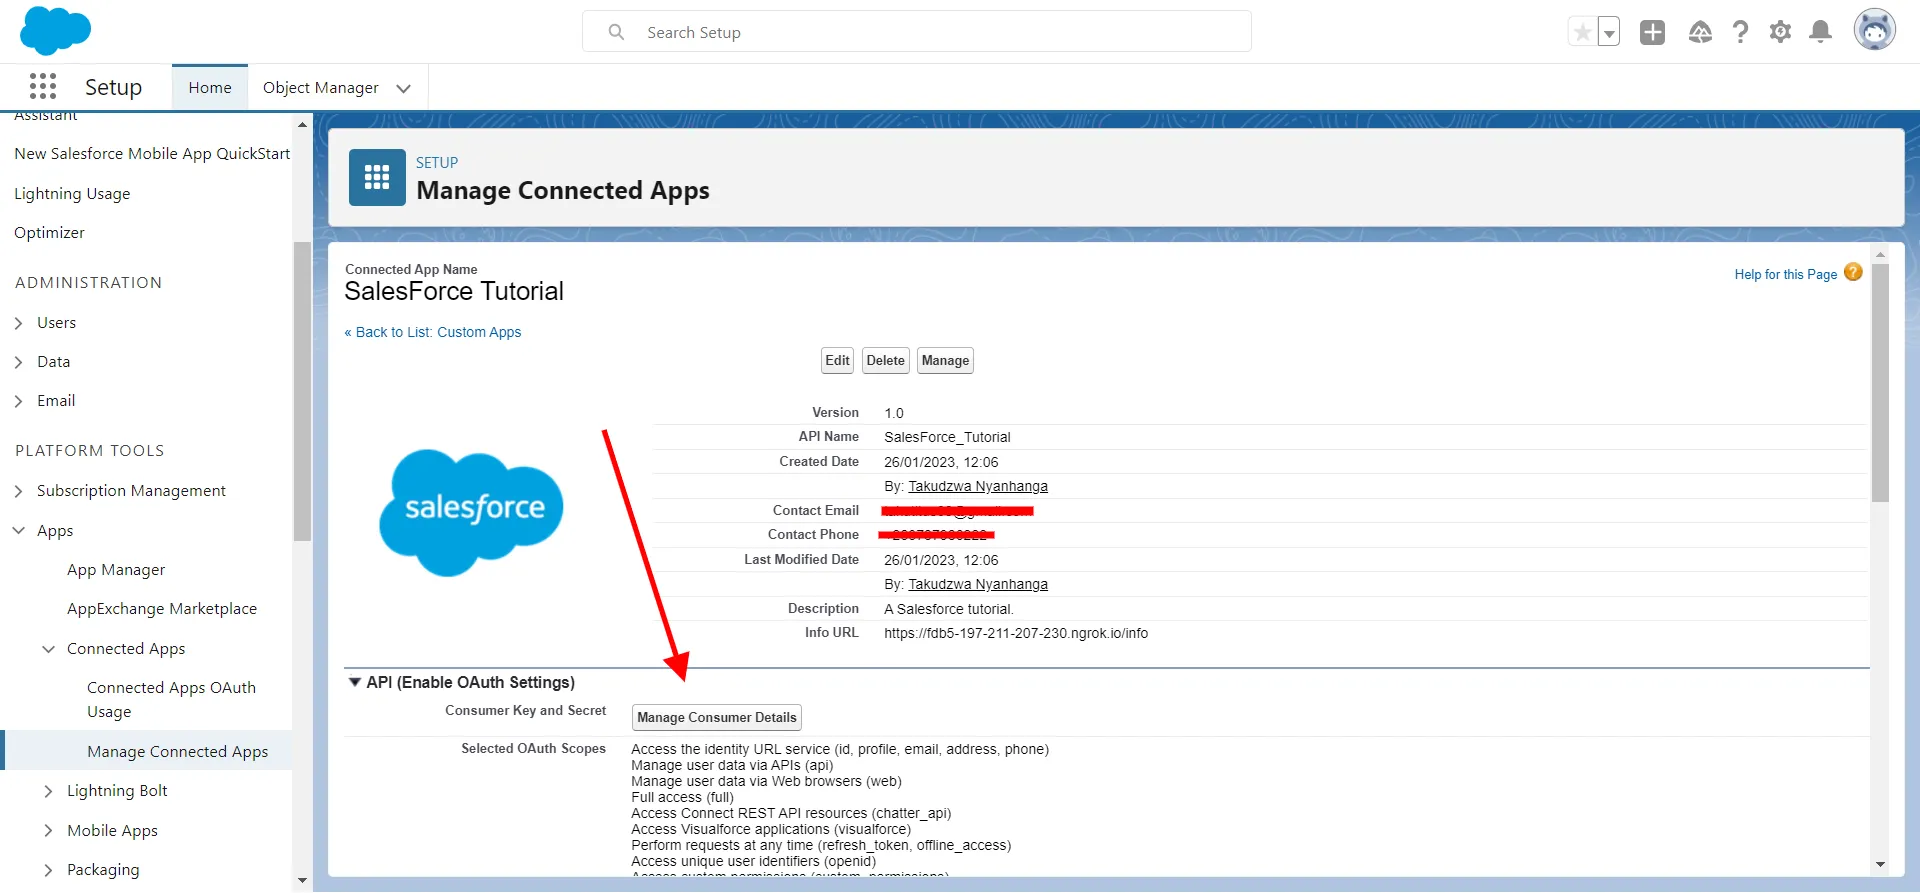
To obtain your consumer key and secret, click on Manage Consumer Details, which will redirect you to a page with your details. Copy your consumer key and consumer secret, which you'll use in the following steps.
You must also obtain a security token for your account. You can do it by following the instructions on the Salesforce site.
Once you have this information, create a file, name it credentials.py, and add the values below:
You'll need these values to obtain an access token from Salesforce.
Note: Make sure you use the classic experience URL for your <code class="blog_inline-code">DOMAIN</code> variable, which is in the format <code class="blog_inline-code">https://MyDomainName.**develop.my.salesforce.com**</code> or <code class="blog_inline-code">https://MyDomainName.**my.salesforce.com**</code>. Do not use the lightning experience URL, <code class="blog_inline-code">https://MyDomainName.**develop.lightning.force.com**</code>, as it does not work with the API.
Lastly, you have to obtain an access token. You'll need to make a request to the Salesforce token endpoint using your client ID and secret. Salesforce provides many different OAuth authorization flows that you can use to obtain the access token. This tutorial will use the Username-Password authorization flow in Python.
To obtain your access token, create a file, name it app.py, and add the following code to it:
The code above defines a function, <code class="blog_inline-code">generate_token</code>, that calls the Salesforce API and then extracts the access token from the response and returns it. You'll call this function and use the access token it generates to authenticate your API requests to the Salesforce platform in the next step.
Make HTTP Calls to Create Contacts
In this step, you'll make HTTP calls to create contacts on Salesforce via the Admin API.
The Salesforce contacts schema defines the structure of the data that can be stored for a contact. This schema includes fields such as First Name, Last Name, Email, Phone, Mailing Address, and so forth. When you make an API request to create a contact, you need to include the data for these fields in the request payload.
Below is how to make an <code class="blog_inline-code">HTTP POST</code> request to create a contact on Salesforce. Append the following code to your app.py file:
You can run the code using the following command:
You should get the following output:
Set Up a Webhook in Salesforce
Now that you have successfully created a contact in Salesforce, it's also helpful to learn how to respond to events when someone else creates a contact in your Salesforce instance. For example, you might want to sync all contacts created in Salesforce with your mailing list on a tool such as MailChimp. Webhooks are a great way to do this. They're user-defined HTTP callbacks triggered by specific events, such as when a new contact is created.
In this example, you'll set up a webhook in Salesforce to listen for contact creations and trigger a callback to your application. The purpose of this webhook will be to keep your mailing list up-to-date with the latest contact information in Salesforce.
The code below creates your webhook using the <code class="blog_inline-code">flask</code> web framework and parses the data using the <code class="blog_inline-code">xmltodict</code> library for reading XML. Create a file, name it webhook.py, and add the following code to it:
To test this code, Salesforce requires your webhook to be accessible over the internet. You can do this by deploying your webhook application to your own cloud or PAAS, like Heroku. You can also use ngrok to create a local tunnel to your machine, which is accessible over the internet, and through HTTPS, which is what you'll do in this tutorial.
Download ngrok and run the following command:
Now open a second terminal and run this command:
Using ngrok, this command creates an HTTPS tunnel that exposes your application over the internet. You should get the following output:
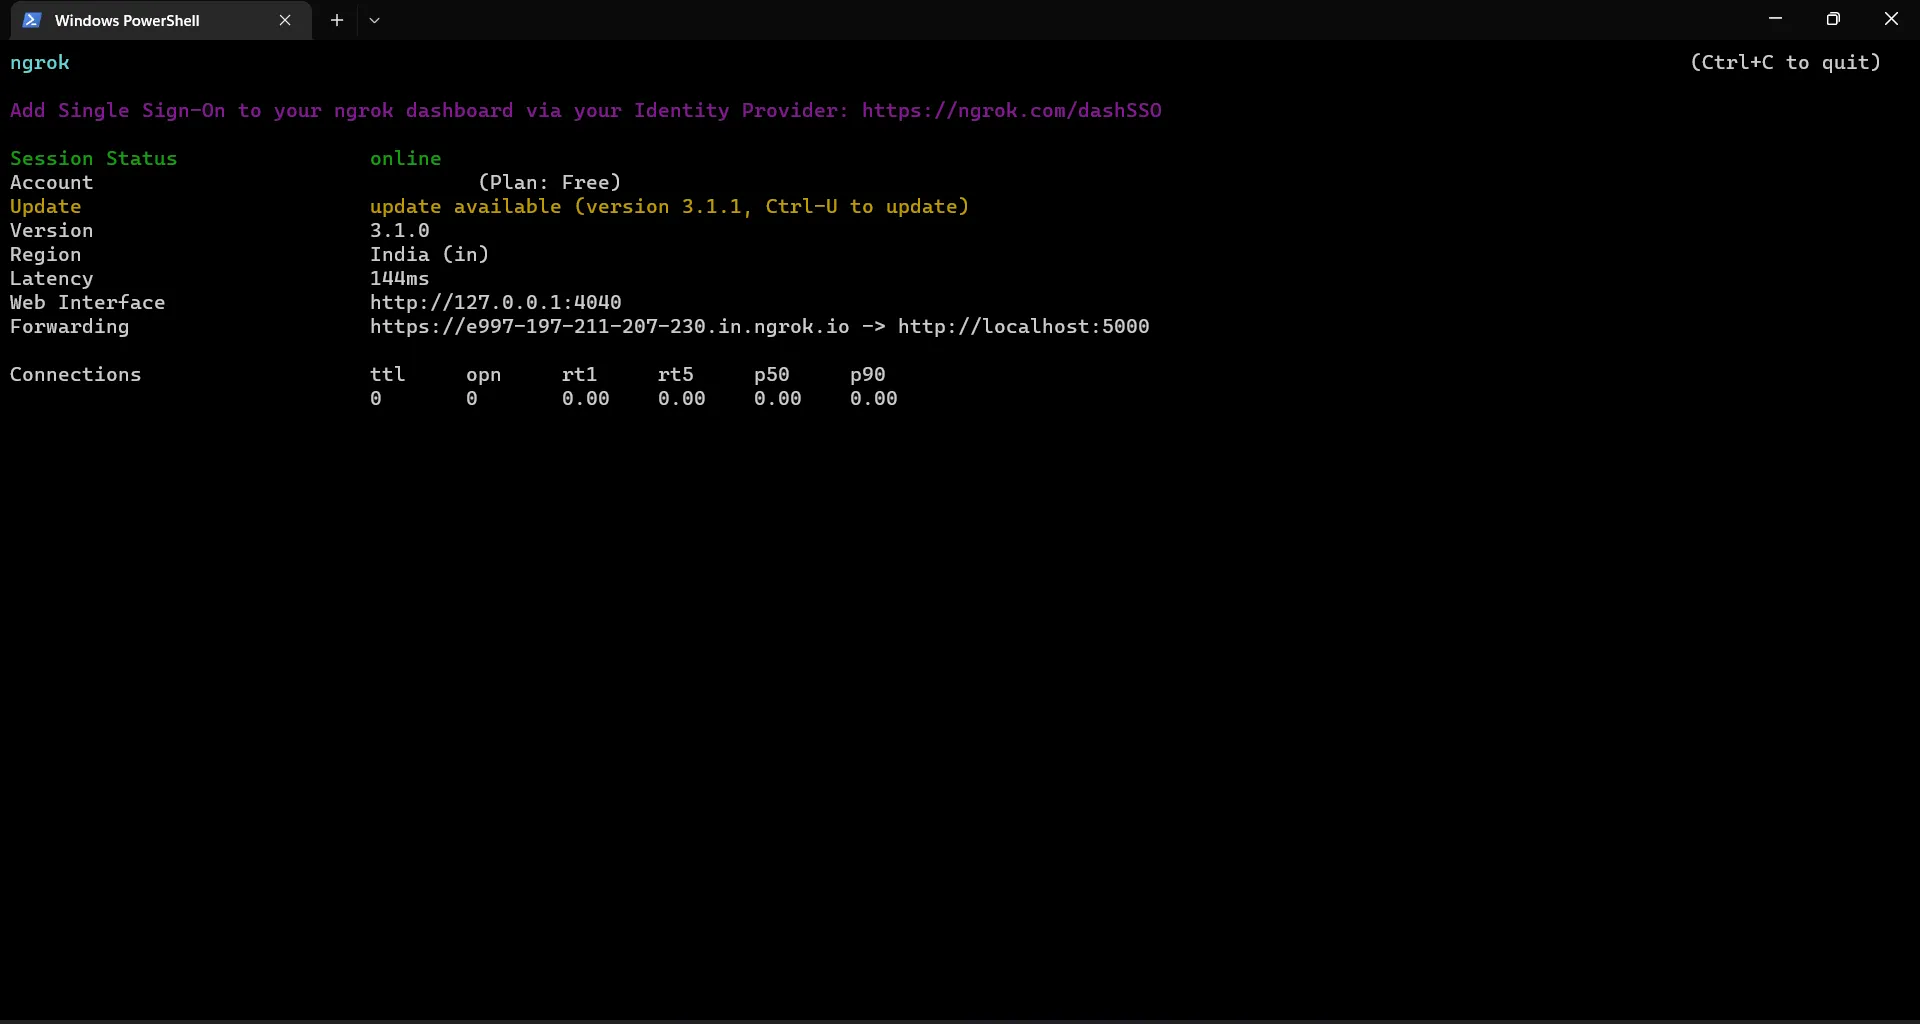
Please take note of the URL you get under the Forwarding section as you'll later need to tell Salesforce to use it to inform you of new contacts.
Configuring a webhook in Salesforce involves two steps. First, you set up an outbound message to tell Salesforce which message to send to your webhook. Next, you configure a flow, which tells Salesforce what trigger to listen for before executing your action, which in this case is the outbound message.
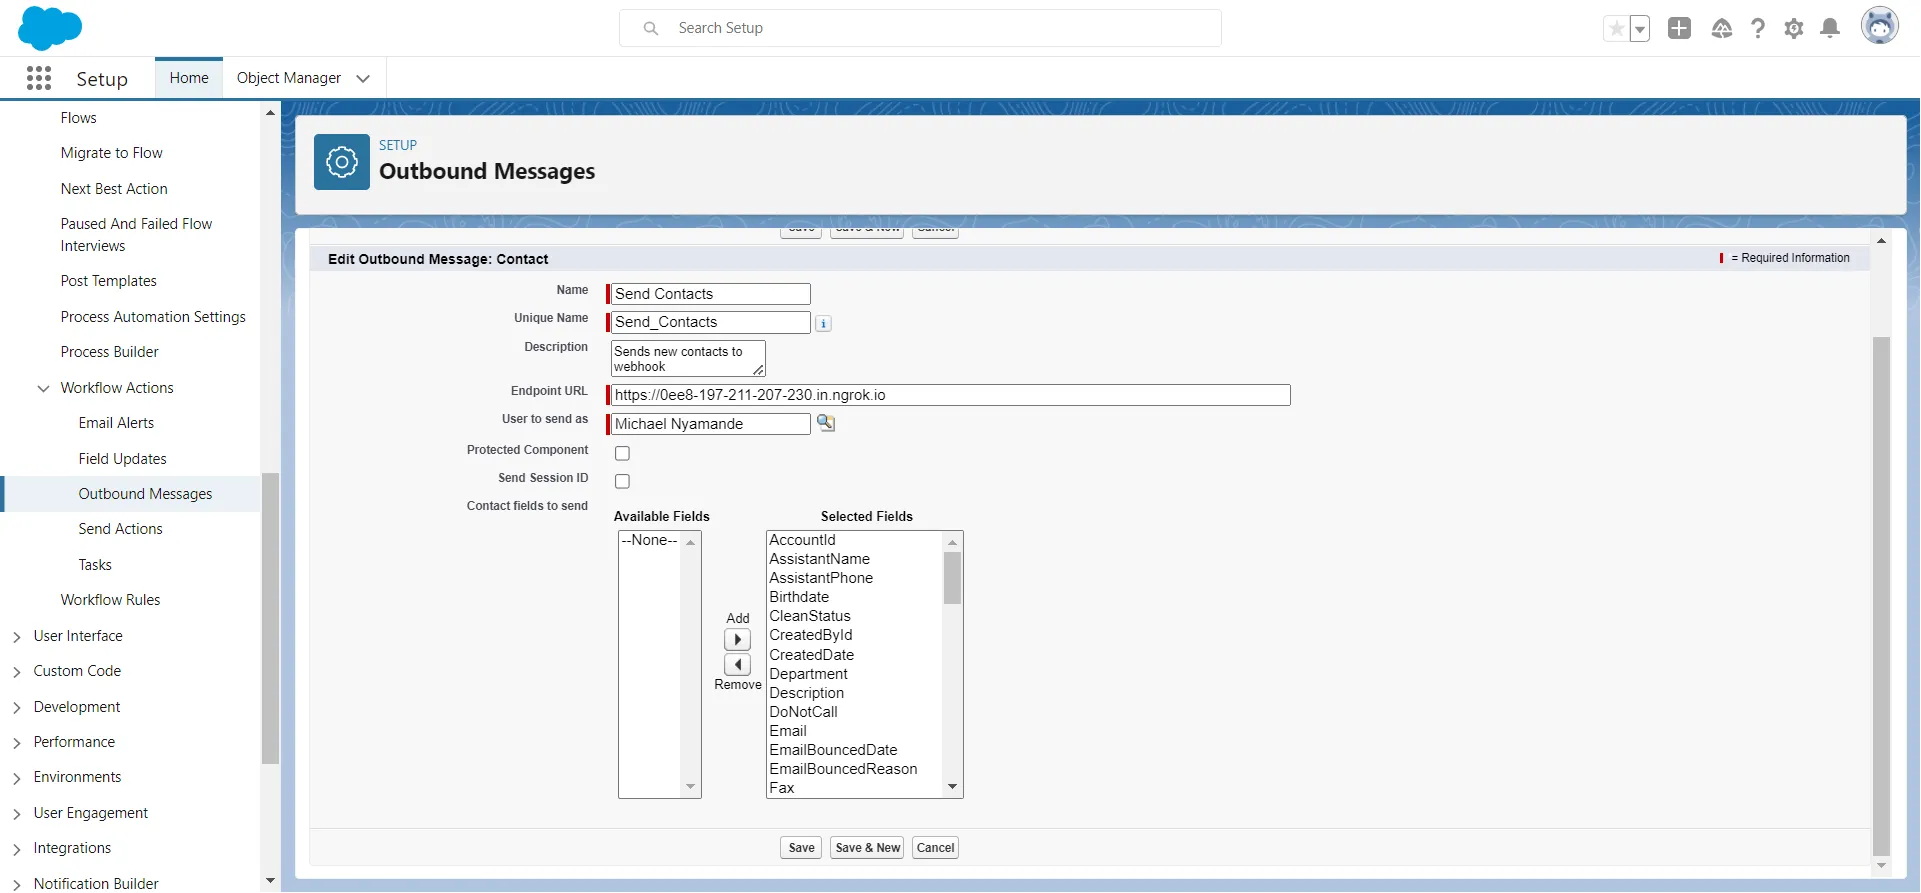
To set up the outbound message, follow these steps:
- In Salesforce, go to Setup > Process Automation > Workflow Actions > Outbound Messages.
- Click on New Outbound Message and choose Contact from the objects dropdown.
- Enter a name for the outbound message.
- In the Endpoint URL field, enter the URL for the webhook that you got from ngrok.
- Select the fields you want to send in the outbound message payload and click Save. For the purpose of this tutorial, you can select all fields.
To create a flow, follow these steps:
- In Salesforce, go to Setup > Process Automation > Flows.
- Click on New Flow and choose Record-Triggered Flow.
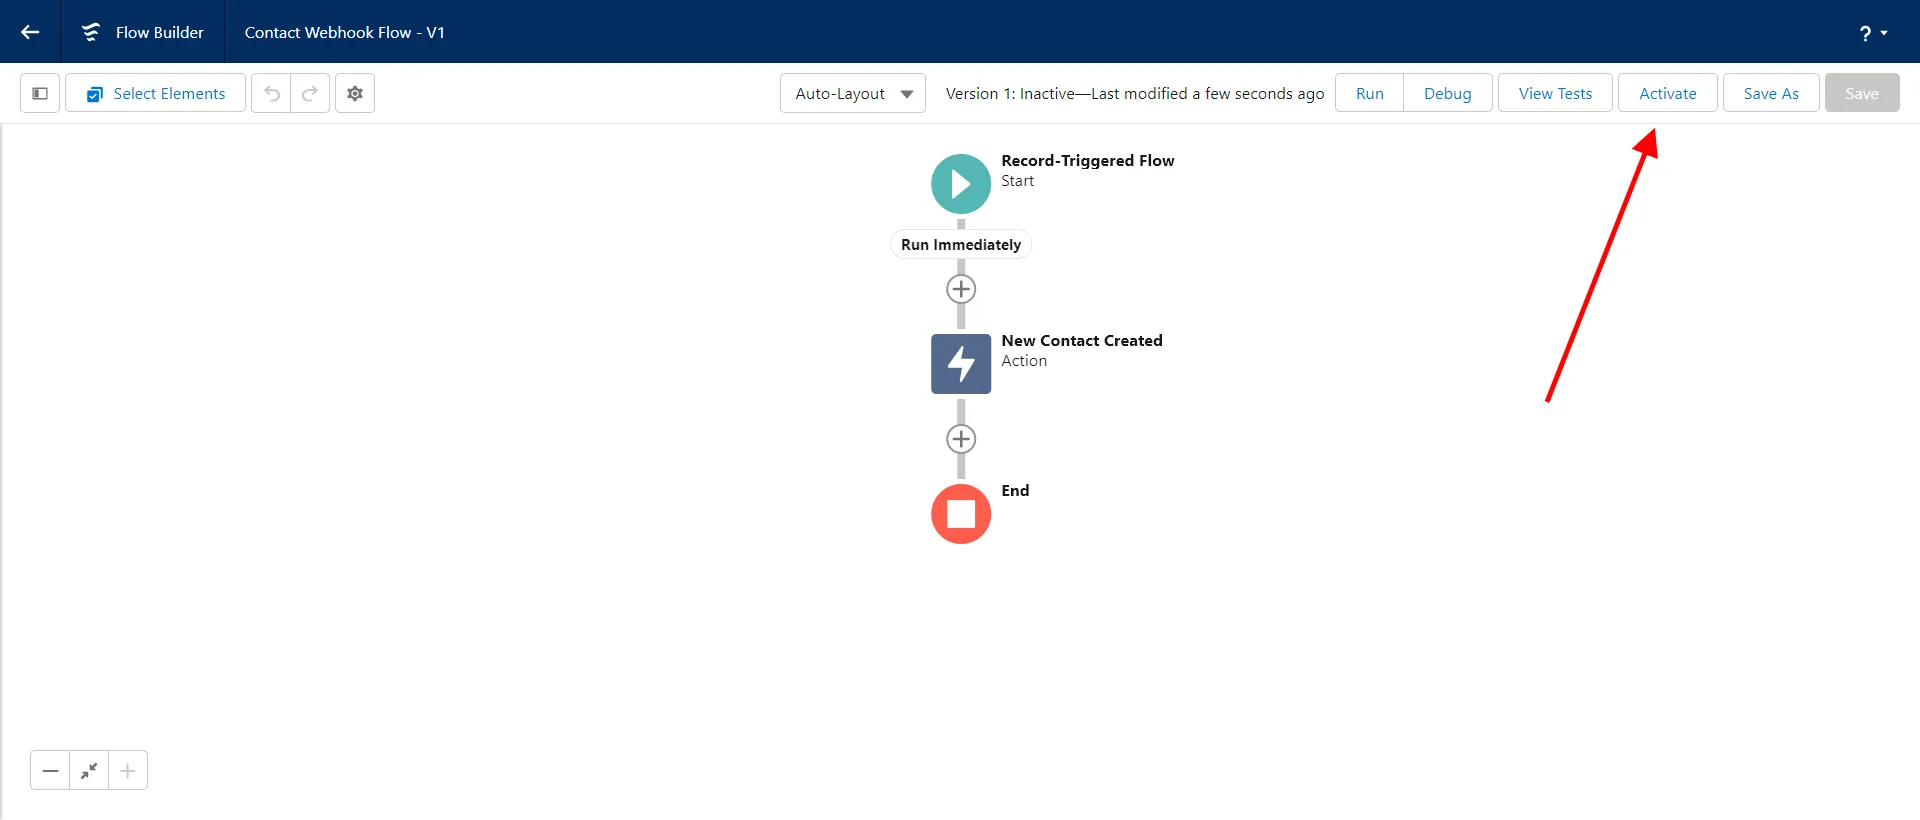
- Select Contact as the object that should trigger the flow, and choose A record is created as the trigger. You can leave all other fields in their default state and click Done.
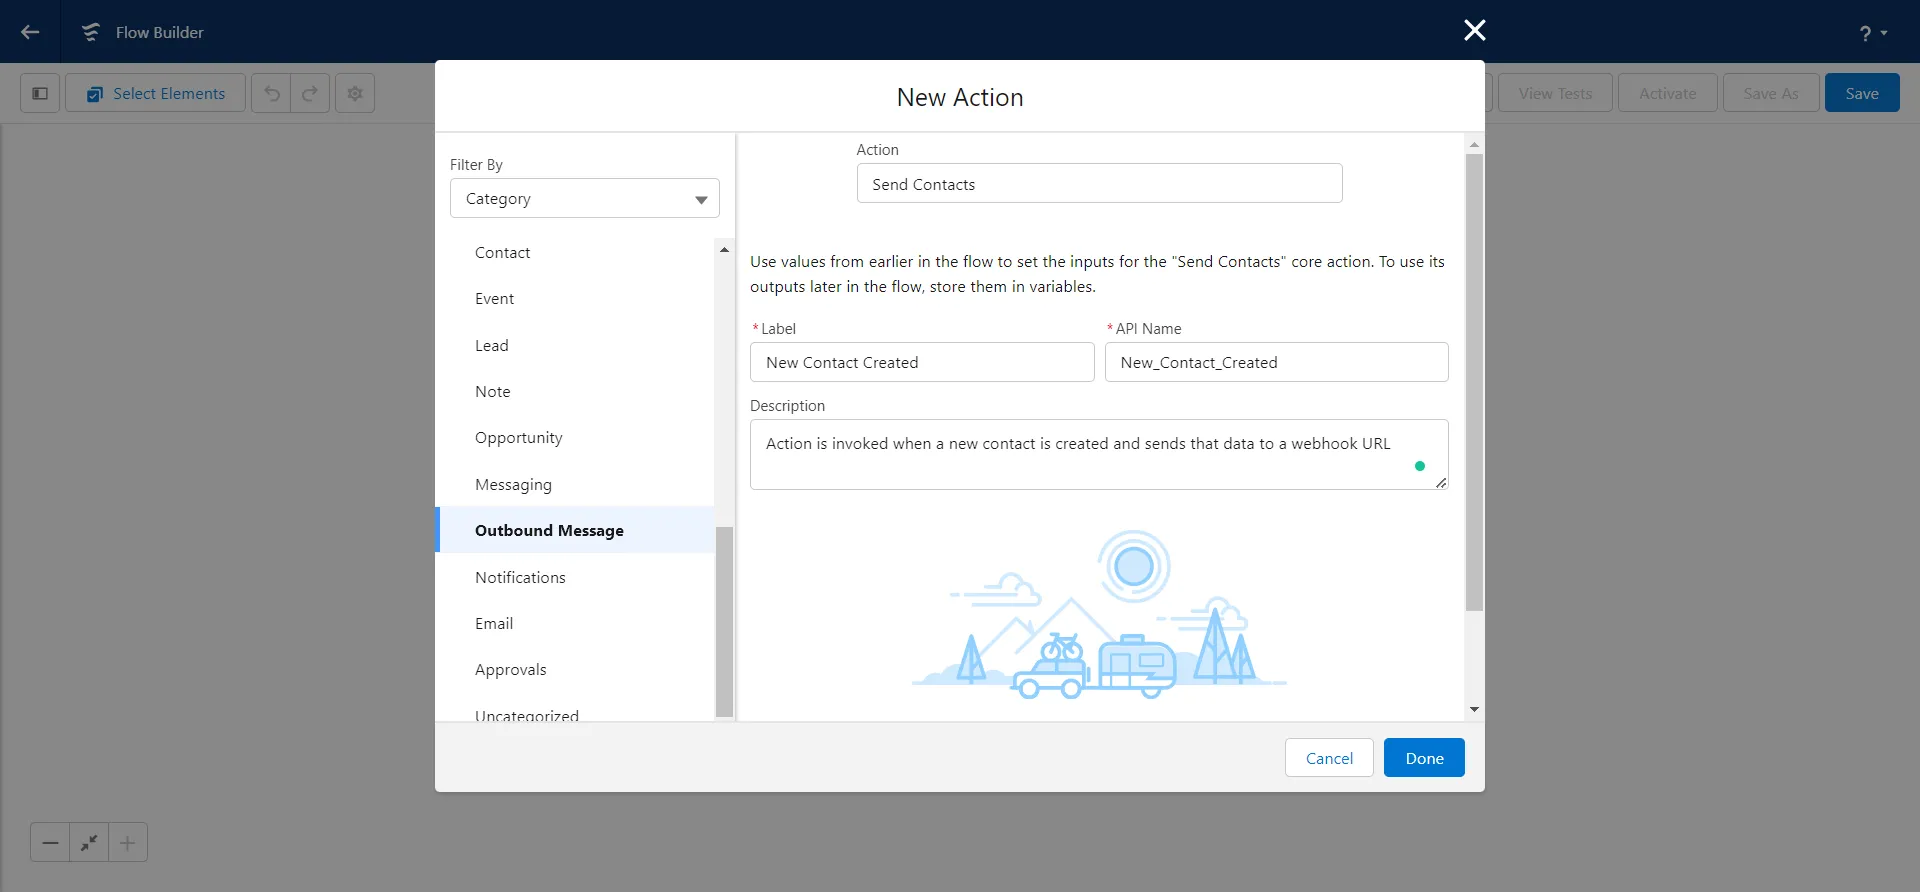
- Add an action element to the flow, select Outbound Message as the category, select the outbound message you created in the previous step in the action filter box, and click Done.
- Save your flow by clicking Save in the top right corner.
- Activate your flow by clicking the Activate button in the top right corner
Now, create a new contact using either the application you created in the previous step or the Salesforce dashboard. You'll see that your webhook is invoked for each new contact created. You should get an output similar to the one below but with the email address of the new contact:
In case you run into any issues, you can review the complete codebase of this tutorial in this GitHub repo.
Conclusion
You now know how to authenticate with the Salesforce Admin API and create contacts using this API through Python. You've also learned how to set up a Salesforce webhook that listens for when contacts are created. In this example, your integration with Salesforce allows you to keep your contact list updated with your external mailing list.
Following these steps can get you started with integrating Salesforce into your B2B platform. However, Salesforce may be just one of many integrations you need to build. This is where Merge can help.
Merge offers a CRM Unified API with support for more than 40 CRM systems including Salesforce, Hubspot, and Microsoft Dynamics. This means you can build integrations for all your needs through a single API, saving you time and reducing complexity. Choosing Merge means you can focus on building your B2B platform while it takes care of all the integrations. Give Merge a try to see how it can streamline your integration process.
Check out our Guide to CRM Integrations for examples of product integrations, an overview of CRM data schemas, and other useful information to consider as you work with CRM APIs.

.jpg)
.png)


